
What is JAMstack?
Fast and secure sites and apps delivered by pre-rendering files and serving them directly from a CDN, removing the requirement to manage or run web servers.
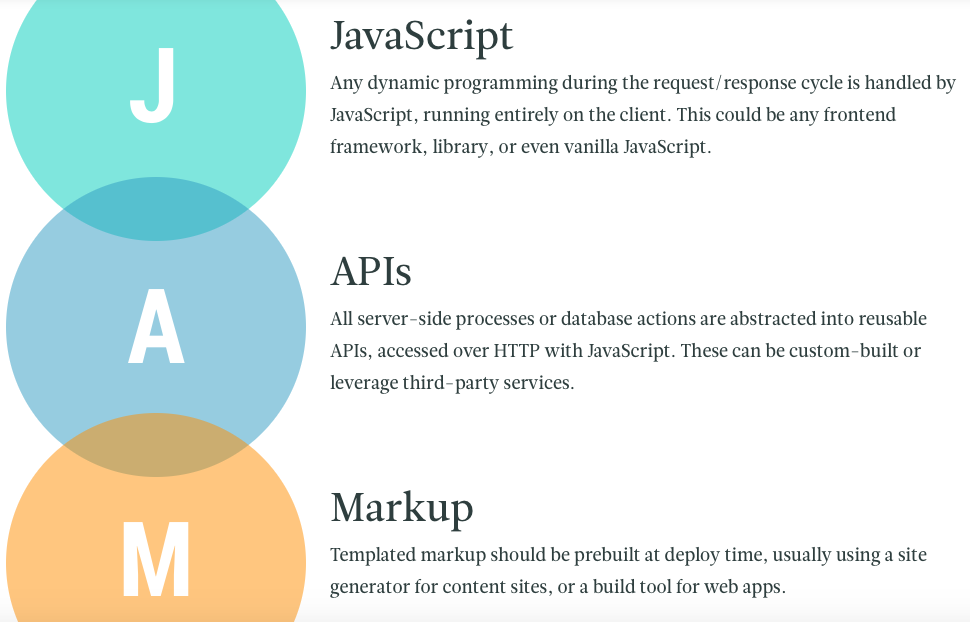
JAMStack stands for Javascript, APIs, and Markup. This stack is arguable the lightest technical stack as it requires no real interactions with a database and relies on mostly third-party APIs.
Why the JAMstack?
- Better Performance
- Cheaper, Easier Scaling
- Higher Security
- Better Developer Experience
The JAMstack application has minimal things to do during runtime which increases performance, reliability, and scale. This is because it requires no application servers. The static content is a highly cacheable and easily distributed Cloud Content provider. This means minimal lock-in to specific vendors.
Enterprise solutions can be built using JAMstack with quicker speed-to-market and lower costs. This is because it requires fewer resources to manage and support the application in production as well as for development. It requires only a small team of developers, and everything can be done with Javascript and markup. It’s not a prerequisite of JAMstack, but it does make sense to reduce the skill-sets needed when delivering for the web.
Pre-rendering with static site generators
We need a tool that is capable of pre-rendering markup. Static site generators are designed for this purpose. There are a few static site generators out there today, most of which are based on popular JavaScript frontend frameworks such as React (Gatsby, Next.js) and Vue (Nuxt.js, Gridsome). There are also a few that are non-JavaScript based, such as Jekyll (Ruby) and Hugo (Go aka Golang).
Hello World – Using Gatsby
- Install the Gatsby CLI. The Gatsby CLI helps you create new sites using Gatsby starters (like this one!)# install the Gatsby CLI globally npm install -g gatsby-cli
- Create a Gatsby site. Use the Gatsby CLI to create a new site, specifying the default starter.# create a new Gatsby site using the default starter gatsby new hello-world
- Start developing.Navigate into your new site’s directory and start it up.cd hello-world/ gatsby develop
- Open the source code and start editing!Your site is now running at
http://localhost:8000. Open the the hello-world directory in your code editor of choice and editsrc/pages/index.js. Save your changes and the browser will update in real time!
Installed App Explained –
.
├── node_modules
├── src
├── .gitignore
├── .prettierrc
├── gatsby-browser.js
├── gatsby-config.js
├── gatsby-node.js
├── gatsby-ssr.js
├── LICENSE
├── package-lock.json
├── package.json
├── README.md
└── yarn.lock
/node_modules: The directory where all of the modules of code that your project depends on (npm packages) are automatically installed./src: This directory will contain all of the code related to what you will see on the front-end of your site (what you see in the browser), like your site header, or a page template. “Src” is a convention for “source code”..gitignore: This file tells git which files it should not track / not maintain a version history for..prettierrc: This is a configuration file for a tool called Prettier, which is a tool to help keep the formatting of your code consistent.gatsby-browser.js: This file is where Gatsby expects to find any usage of the Gatsby browser APIs (if any). These allow customization/extension of default Gatsby settings affecting the browser.gatsby-config.js: This is the main configuration file for a Gatsby site. This is where you can specify information about your site (metadata) like the site title and description, which Gatsby plugins you’d like to include, etc. (Check out the config docs for more detail).gatsby-node.js: This file is where Gatsby expects to find any usage of the Gatsby node APIs (if any). These allow customization/extension of default Gatsby settings affecting pieces of the site build process.gatsby-ssr.js: This file is where Gatsby expects to find any usage of the Gatsby server-side rendering APIs (if any). These allow customization of default Gatsby settings affecting server-side rendering.LICENSE: Gatsby is licensed under the MIT license.package-lock.json(Seepackage.jsonbelow, first). This is an automatically generated file based on the exact versions of your npm dependencies that were installed for your project. (You won’t change this file directly).package.json: A manifest file for Node.js projects, which includes things like metadata (the project’s name, author, etc). This manifest is how npm knows which packages to install for your project.README.md: A text file containing useful reference information about your project.yarn.lock: Yarn is a package manager alternative to npm. You can use either yarn or npm, though all of the Gatsby docs reference npm. This file serves essentially the same purpose aspackage-lock.json, just for a different package management system.
Deployment
There are many ways to publish and deploy applications, using services such as Netlify, AWS Amplify, and Zeit Now. They all push our pre-rendered Markup to a CDN. Why is this useful? CDNs do automatic load balancing, and they will always serve the content to the closest requesting user based on their geographical location.
Deploy Using Netlify
Step 1: Add Your New Site
Creating a new site on Netlify is simple. Once you’ve logged in, you’ll be taken to https://app.netlify.com. If you’re just starting out, there’s only one option, Click the Add A New Project button.
Step 2: Link to Your GitHub
Be sure to push your repo to GitHub, so that all we’ll need to do is link Netlify to GitHub.
Step 3: Authorize Netlify and Select Your Repo
It’s time to allow Netlify and GitHub to talk to each other. Clicking the Authorize Application button will do just that. Like it says in the image below, Netlify doesn’t store your GitHub access token on our servers. If you’d like to know more about the permissions Netlify requests and why we need them, you can visit.
https://docs.netlify.com/github-permissions/
Step 4: Configure and Build
you can configure your options (if necessary). You did your part let Netlify take care of the rest — it’ll only take a minute.
Done!
In this article, we saw what the JAMstack is, why we should consider using the JAMstack for our next project.